You know how to crochet or knit and you're constantly making things "without a pattern." Well, guess what? That is a pattern...your pattern! And if you've ever wanted to take the plunge writing it down and posting it online for free or to sell, but didn't know where to start, then this is the tutorial for you.
And if you want to follow along with me as I create a pattern from scratch using Canva, check out this video here:
What should be included in a crochet pattern or knitting pattern so that your readers can replicate your designs easily? I've broken down the essential parts of a pattern into a bite-sized list.
A crochet pattern or knitting pattern should absolutely include:
-
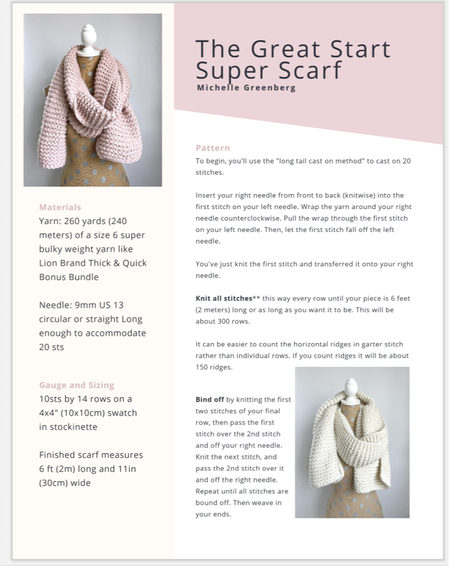
Picture(s) of the finished item
-
Yarn and hook/needle size used and amount of yarn required
-
Gauge (unless sizing isn't important to the pattern)
-
Instructions - there are many types of instructions but written, row by row instructions are easiest for beginner pattern writers.
Additional things that are nice to include in patterns if you can pull it off or think it would really improve the readability of your pattern are:
-
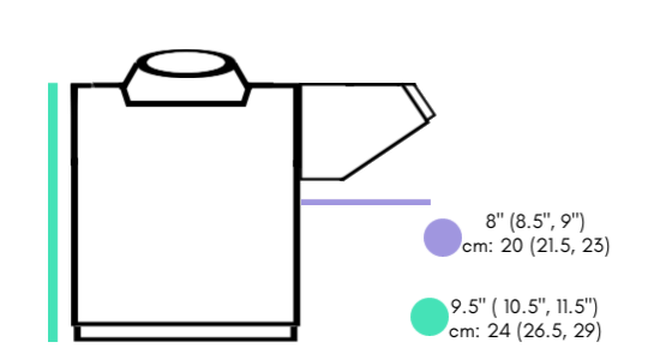
Sizing diagrams - the finished item and/or its pieces
-
Stitch diagrams - depicting the stitch pattern in diagram form
-
Key or glossary of terms and abbreviations used in the pattern
I'm going to assume you know how to create a high quality, printable PDF file. For background on all the technical info (file, font and pixel sizing) check out THIS blog post on that topic.
But in general, a great place to start is the document software you already have on your computer like Microsoft Word.

You can add a photo, the other top 4 bits of info I mention above, save the file as a PDF and you're ready to publish!
Now lets break down those top 4 essential pieces.
1. Pictures
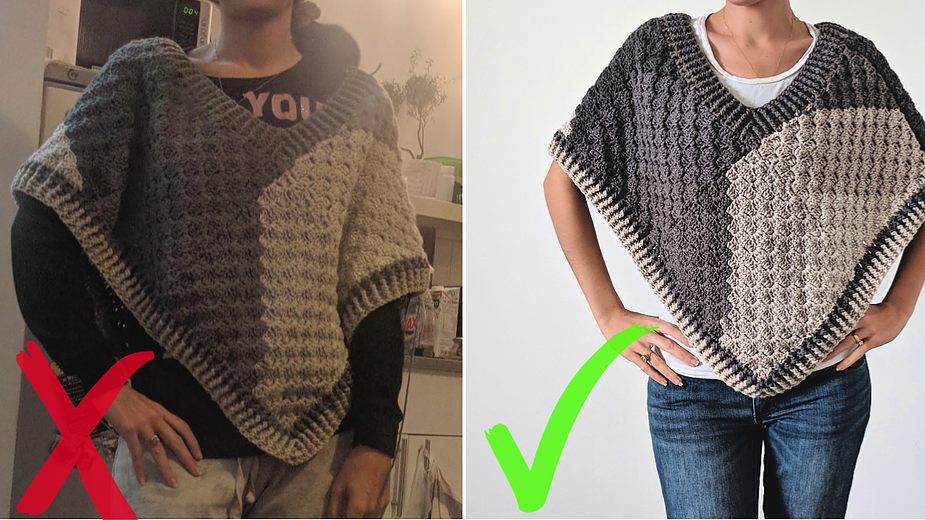
Photos of your finished item should be clear and easy to see. Getting a shot from at least a couple angles is always a good idea. As long as you've got natural light and an un-busy background, you can even take the pictures with your phone!
I like to at least include one on the front page of the pattern and one at the end. Sometimes I'll add a page of just pictures to get all the angles and instruct the reader to not print that page to save ink.
2. Materials
You can say exactly which yarn brand you used and how many balls of yarn or put the yarn weight category and yardage required to finish the project.
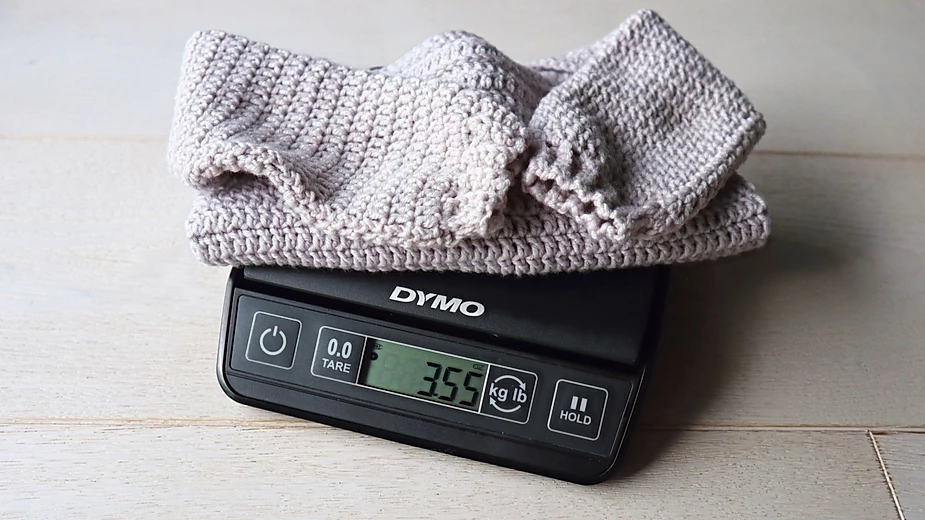
To calculate the yardage you used, take a postage scale and weigh your finished project. Then, if you have the yards and ounces on the back of the yarn label, you can calculate it with this equation:
Project yardage = Project weight(yardage in one ball/yarn ball weight)
If you weren't paying attention in 6th grade algebra, you can also plug your numbers into this "solve for x" calculator where "x" is the project yardage, the number under x is your project weight and put yardage over weight of the yarn ball on the other side of the equation.

Something to keep in mind when listing any measurements in your pattern is to include both US/imperial and metric measurements. Especially if you plan on listing it on international platforms like Lovecrafts.com where there's a healthy mix of shoppers from North America, Europe and everywhere else! So say US K (6.5mm) hook and give lengths in yards and meters when possible.
A great resource for needle and hook conversion charts as well as virtually any other measurement or standard of the yarn world you could imagine is The Craft Yarn Council. I highly recommend checking out their site.
3. Gauge
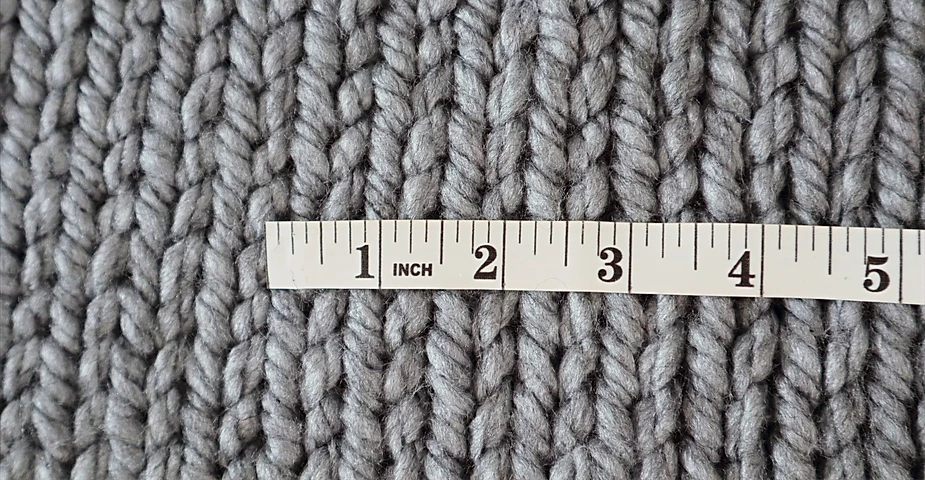
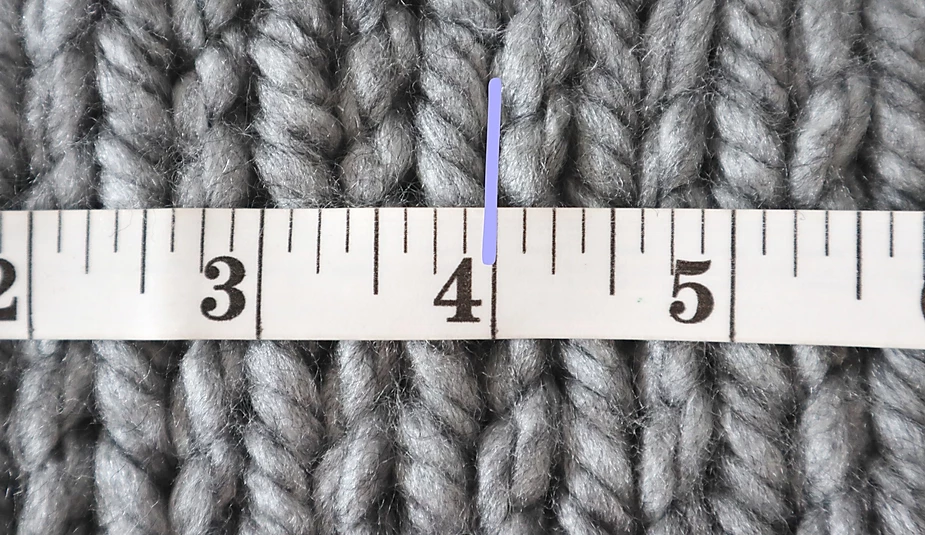
Simply put, gauge (or tension) is how many stitches across and rows tall your work is in a 4in x 4in (10cm x 10cm) square. Gauge can be an immensely important part of a pattern where size and fit is a factor like a tight-fitting garment or even a pillow cover designed to snugly fit a specific size form.
Even if your project doesn't have a specific fit (say a shawl for example) many knitters and crocheters appreciate knowing the gauge just to know they're on the right track with the yarn and needle/hook size they're using.
It's easier than it would seem to include this. You can create a separate swatch, wash, block and dry it as the intended garment is meant to be washed and measure your stitches and rows in 4 inches.
Try to be as precise as possible. If you measure 7 and a half stitches in 4 inches then, put 7.5 stitches per 4 inches. The more accurate, the better.
As I mentioned, gauge isn't essential for every project. But rather than omitting the gauge, if you have fairly normal tension and you used the hook/needle size the yarn label calls for (more on reading your yarn label here), put the yarn ball gauge in your pattern and mention that you got it off the yarn label. Or better yet, measure the stitches and rows in 4in on a regular, flat piece of your finished project. You're readers will appreciate the extra guidelines to replicating your design.
4. Instructions
Finally it's time for the actual pattern! There are almost as many ways to write instructions as there are ways to knit a sweater. It's up to you to choose which one is best for your writing style, for the pattern you're trying to make and your skill level as a pattern writer.
Many visual learners love stitch diagrams. Below is an example of a crochet stitch diagram I created with the free software Stitchfiddle.com
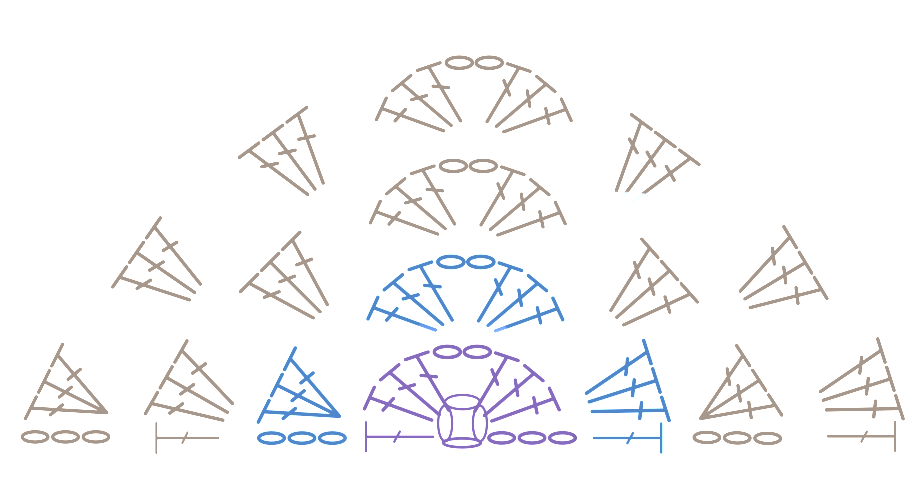
Photo tutorials are also an obvious choice for visual learners, but it can be tricky to get the right shots, especially if you don't already have the proper camera set up.
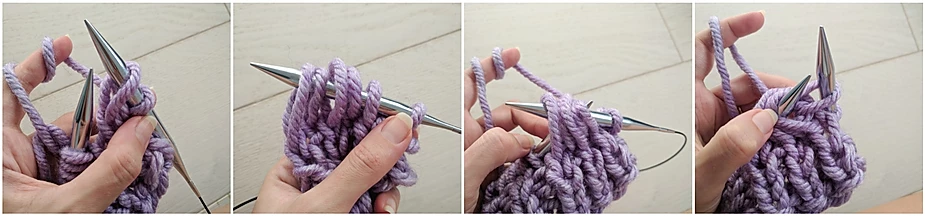
For the beginner pattern writer, you can't go wrong with row by row, step by step, written instructions.
Row 1: K1, *p2, k2* rep to last st, k1
Row 2: P1, *k2, p2* rep to last st, p1
rep rows 1 and 2 to desired length
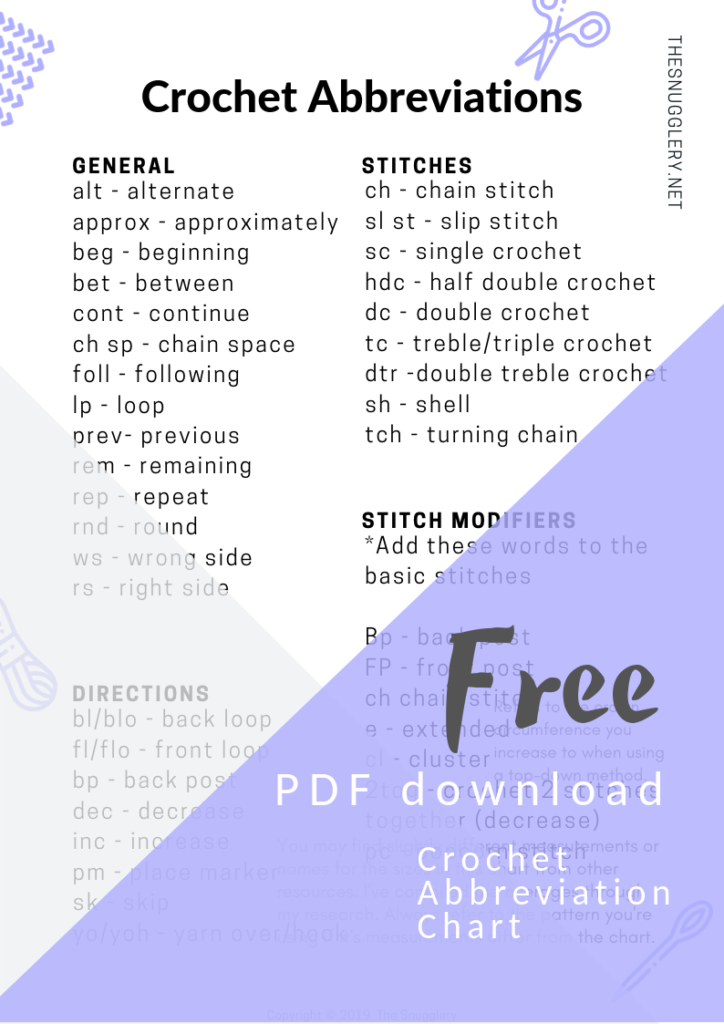
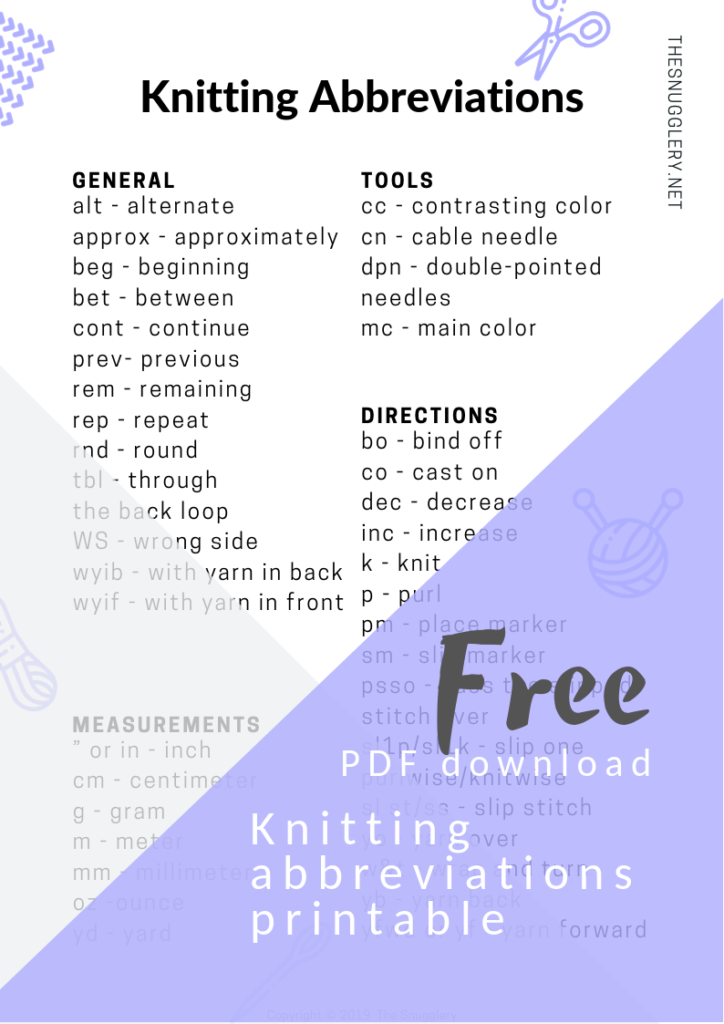
To do this, you can familiarize yourself with common knitting and crochet abbreviations, and as you work your pattern, pause and write down exactly what you do every row using those abbreviations. You can grab copies of my free abbreviation charts here.
And if you're looking for a way to amp up the style of your PDF patterns, check out this post where I go into using free software like Canva to get templates for beautiful looking documents
More Guides
- 6 Crochet Stitches You ALREADY Know (If You Can Make Single, Half Double, And Double Crochets)
- DIY Crochet T-Shirt Poncho – Upcycle an Old Tee into Festival-Ready Style
- Are You Really Gonna Crochet A Labubu? - Paid, and Free Patterns To Help You On Your Lafufu Journey
- Free Gauge Calculator: Your Key to Pattern Matching AND Creation